
Right,
here we go with the eagerly awaited T030d Small Fishing Boats from Scalescenes.
It seems like I’ve waited an age for these to be released. I’ve been very eager
for this kit, as it is of a new base construction unlike previous marine kits.
The kit has thrown up a number of construction conundrums. But as expected,
Scalescenes have managed to overcome every one.
The
kit is very comprehensive in its content. With 5 (yes 5) complete hull colour
options to construct. The option of the wheel house at the front or rear of the
boat, very cleverly incorporated into the same hull.
The hull can also be built
as if it were sitting in water or a complete hull underside. Complete with
keel, bilge keels and even a propeller.
So
here we go. First as always, fix all of the sheets to the relevant thickness
card stock.


Next
cut out glue together the lower hull and deck. Note that these are in two
halves. All will become apparent shortly.


While
the glue is drying in the clamps, cut out and glue together the lower hull
pieces.

Then glue the deck and lower hull sections together.

I’ve
opted for this build, a full hull version, so I need to cut out a couple of
keel sections.


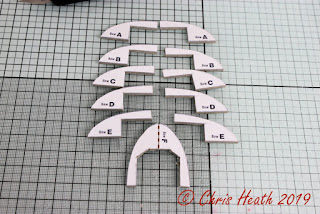


Join
the respective hull and keel sections together.


The
next step I’m afraid I forgot to take a picture. But all it was was to glue the
two halves together. Once the two halves are joined, this gives a very sturdy
and stable hull.
The
bow sections are next. Again cut out in two halves.

Glue
the bow sections to the hull.

Choose
a deck option next. I’ve opted for a timber deck on this one.

Put
the stern section together next and glue to the deck. The bulwarks get fitted
next.

These
overhang slightly, but this is fine, as they get cut off flush once the glue
has dried.


Once
the glue has completely dried, take some sandpaper and rub the hull sides down
to even out any uneven ridges. I like to glue a piece of sandpaper to a piece
of MDF to make a study sanding block.

Now
that the hull is smoothed down, glue the bulwark stays into place.
Once the glue has dried. Cut
the excess bulwark stays off.


