Showing posts with label Low Relief House Backs. Show all posts

Saturday, 6 July 2013

Back to the land of the living........

I think that I'm ready to return to the world of blogging. The reason I have been missing for so long is that I have had a bit of a family crisis of late. At the end of April, after a very short illness, I lost a dear brother very unexpectedly. He was only 53, four years my senior and I miss him dearly. The thought of sitting at my craft table and making models was he last thing on my mind. Not to mention sitting at a computer and blogging about it. However, they say that the sooner that you try and get back to normal the better. So here we go again.
In my last post told you that I was making the 1930's semi detached houses from scalescenes. Well since the passing of my brother I'm afraid that it has been left in limbo a little bit. It's about three quarters done, so I need to take some pictures and get them posted. I will try and get myself motivated tomorrow to take these pictures. It sounds like I've been vegetating in a darkend room, but his is not the case. Myself and my wife Jak, have taken up cycling and it has helped me immensely,
getting out in the fresh air and just going where ever the moment takes us. Plus I've managed to lose 56 pounds (25.5kg) which isn't a bad thing! Today I went for a ride to the beautiful city of Durham. A round trip of around forty miles. The weather was absolutely beautiful and when I reached Durham there were several street brass ensembles playing away merrily. They entertaining the crowds with a range of witty and traditional tunes. I could of stopped and listened all day, but I was on a mission to achieve forty miles, so away I went.
This was the view from one of the bridges that cross the river wear at Durham.
And this was a quick picture I took of one of the bands.
Forgive the layout in this post, it's all over the place but I'm writing it on my new fangled iPad, and I don't quite know what I'm doing yet.
Right, I promise to get my butt into gear tomorrow and get normal service resumed.
Until Next Time..........


Sunday, 13 January 2013

Low Relief High Street Backs, The Next Instalment……….


This is just a quick post as we have our Grandson Jack sleeping over tonight and he has got me running around in circles. But as promised in my last post here are the finished pictures of the first façade from T005a kit from scalescenes.

                           IMG_0954  IMG_0955

IMG_0956

There is still a lot of finishing features, like the chimney stacks and coping stones, but these will be added at the very end when I have finished all of the façades and the I will do them all at the same time.

I’m well on my way with the next façade and i should have the pictures up here within the next couple of days. Sorry this was a short post but, Jack is calling.

Until Next Time……………..

Chris sig

Sunday, 25 November 2012

Low Relief High Street Backs Part Two…………..

Here is the next stage of the R005a Low Relief High Street Backs from scalescenes. I have completed the other three carcasses, the other large one and the two smaller ones required for the four backs. The next step went a bit out of sync I’m afraid. I started to build the carcass for the odd ball element of the kit, which is the Tudor style building. For all it is a bit fiddly for me with fingers like pork sausages, I do like this part of the build. The level detail incorporated into such a small piece work always astounds me.

So while I was in the mood and had piece and quiet, I set to and cut out all of the sections needed to complete the entire building.

IMG_0882        IMG_0883

Yes, it may be a pain in the derriere for me to cut out, but you have to agree that the results are just stunning. Like I said earlier, the detail that goes inside all of these buildings that nobody will ever see is a crying shame. Once the layers are put together on top of each other, this is when you start to see the model come to life.

IMG_0884        IMG_0891

IMG_0892

Unfortunately this is where it all went to pot. Instead of just building the carcass. I’m afraid I got carried away and completed the whole building.

IMG_0887        IMG_0890

The door and wall section for the front went on and it is very clever. I challenge anyone to spot the join between the front and side wall.

IMG_0897

It was a case of, I’ll just put this bit on, and that led to maybe just try this bit in place to see what it looks like, and before I knew it, it was finished.

Whoops!

IMG_0902         IMG_0903

I just love the fine detail. Even down to window sills. And don’t forget, these buildings are all downloaded from the internet and printed off on your printer!

IMG_0905

Right, get back on track and follow the instructions in order! The next step is to, believe it or not, build the individual down pipes for the other four buildings. This you will see in my next post. That’s if I can follow the simple instructions and not get carried away again.

Until Next Time……………

Chris sig

Monday, 19 November 2012

Low Relief High Street Backs………….

Well I’ve finally started the T005a Low Relief High Street Backs from scalescenes. What with holidays, work and family commitments, I’ve not had much time for myself, let alone time to sit and build a model. But things are now back on track and I’ve got my head  down and my knife out.
The Low Relief High Street Backs are a stand alone unit or can go together with the T005 Low Relief High Street to make a complete building.
First task is to cut out all of the windows and stick them to some thick acetate. I find so easy to complete this task, as I print them onto self adhesive labels and this makes it easy to fix them to the sheet without getting glue all over the acetate. There is a sheet of windows that can be printed straight onto a sheet of OHP film, but my preference is to use the acetate and labels.
IMG_0872             IMG_0873
The initial build is exactly the same as the Low Relief High Street. A simple, but sturdy carcass forms the base. The floors and ceilings are made out of 2mm board and then stuck together back to back.
IMG_0869
These get glued directly onto the backs.
IMG_0876
While the glue sets, you need to cut out the sides. Talking of glue, I’m often asked what glue I use. It is a Quick Dry Tacky PVA glue. Available at most craft shops or on line. You only need to hold the piece for a couple of seconds and it bonds. Not totally, but enough to keep it in place until it does cure.
IMG_0877
Again, these are 2mm thick and when glued to the floors and backs it makes the very sturdy carcass. (Oh, and that’s the glue I use).
IMG_0880
There is three more to build. One more large one and two smaller ones. There is a fifth one which is a little different, but I’ll get to that one later.
Until Next Time…………..
Chris sig

Wednesday, 20 June 2012

T008 Low Relief House Backs…………….

As promised I have put together the Low Relief House Backs from scalescenes. I have enjoyed building this kit, as it has had a few techniques that have been different to the previous house builds. I think, it may be just me, that they are getting easier as the kits roll out. I haven’t thought about where it is to be positioned at Wynyard Lane yet, but I think I may have to reconsider a few things and may be build a few more of these houses.

Anyhow here they are from the beginning……
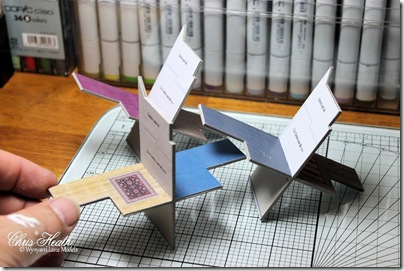
IMG_0138       IMG_0141

Once the main sub-structure is put together, you can the start on the interior walls. These are not just decorative, but they also form the main support for the ceiling.

IMG_0143       IMG_0144

Next comes the exterior walls. But I had a bit of a problem.

IMG_0149

I accidentally ripped one of the cover layers as I was peeling it off the backing paper. Sorry, for those of you that don’t know, I print out my images onto A4 adhesive labels, not paper. I find it a lot easier and quicker than gluing the sheets onto the board. As I was saying, I ripped the sheet, but rather than print out another sheet I coloured over the rip and said that the end house has got mining subsidence! As did a lot of these type of houses of this era.

This section actually has the downstairs  interior wall already in place.

IMG_0150

Once glued into place, along with the side wall, they help to bring the structure together and give it its strength.

IMG_0151        IMG_0152

The main walls come next. There is a lot more to this wall than meets the eye.

IMG_0153

Not only do they form the front façade, they also build up to form a defined edge and a wrap for the chimney and, with the addition of a third layer, they also provide a prominent down pipe from the gutter.

IMG_0157       IMG_0154

IMG_0159       IMG_0161

At this point all three elements came together into one to form the six houses in the row.

IMG_0160

Next is the addition of the ceilings, which also provides the outside guttering. Very clever!!

IMG_0168

The roofs are basically the same as they are on the many off the scalescenes houses, very easy but effective. As long as you keep the strips in order, the will give the effect of weathering.

IMG_0172 

I made the mistake of tiling all of the roofs separate and off the main building, BUT, if I read the very simple and concise instructions, I would have realised that I should have put the blank roofs onto the buildings and then put on the tiles, as they are cut in specific lengths so you can place them staggered and this would have given a seamless finished complete set of roofs. Not like mine with visible joints. DOHH!!

IMG_0176       IMG_0175

Just the outside walls to put on now. I was going to put on outside walls that I built in my previous post but, there is a slight difference in depth on the ones that I built for the T022 Houses. So I built the right ones for the kit.

IMG_0179       IMG_0180

IMG_0182

Well that’s the m done and dusted, and I must say I’m very pleased with the final result. Like I said at the start, it has a few new techniques and it was pleasure to build. I think I may have to build a few more once I decide where I will finally place them at Wynyard Lane.

I don’t know what I will be building next until I go trawling on the scalescenes site. I suppose I could shake my backside and get up in the loft. the only problem with that is during the summer it gets incredibly warm in the loft. When I built the loft room I foolishly omitted loft windows and now in hindsight they would have been great for ventilation. I suppose I could always retro fit a air conditioning unit (don’t tell the wife).

Until Next Time…………

Chris

Monday, 11 June 2012

Outbuildings and Walls………

Those very generous people at scalescenes  have come up with a free add on for the T008 Low Relief House Backs. The kit already come with walls in the download, but I found it odd that the back walls had no gates, so there was no means of access to or egress from the property. I mean, how were you going to put your bins out! So I contacted scalescenes with my concerns and they replied stating that these houses were designed to back onto a railway line, so it wouldn’t be wise to have access to the railway line.

Anyhow, they took on board my suggestions and along with other modellers comments and they came up with the free add on pack with back gates and even coal houses. Not only do these fit on the T008 Low Relief House Backs, they also fit on existing T022 Small Terraced Houses.

Well I had to build a set for my existing set of T022’s.

Please excuse the colour of my walls. These pictures do not give a true representation of the product. I am having a little problem with my printer and is not printing true colours. But they will have to do for now.

 IMG_0127       IMG_0128

IMG_0130     IMG_0131

What I like about this add on is that it even has coal house hatches.

 IMG_0133       IMG_0134

I know that these are not yet permanent, but I had to have a look at what they might look like.

IMG_0135

Well I suppose that I’d better get a  start  building the T008 Low Relief House Backs.

Until Next Time……………

Chris