Saturday 19 December 2020

Gift Certificates..........


Just a quick reminder for, and for those who dont know, there are Scalescenes Gift Certificates  available on the Scalescenes website. These are an ideal gift for that person who is hard to buy gifts for. They are available for any amount however large or small. So, if you are after a specific kit or kits, but youve been holding off buying them, start dropping those subtle hints to your loved ones and direct them to the Scalescenes website. Here is the link https://scalescenes.com/product/scalescenes-gift-certificate/

They make ideal Christmas gifts.

Until Next Time..........


Thursday 22 October 2020

Jack Arch Bridge Pt. 2..........

I’ve finally got round to finish the Scalescenes R012a Jack Arch Bridge. I didn’t have much to do to finish it, and i got it finished in no time at all. It’s just taken me awhile to get round to write the post. I feel frustrated with the new format of the blog writing program which I use. So what used to be an easy enjoyable task to write a post, has now become slow and frustrating. I suppose I’ll get my head around it eventually, but for now, I’ll just have to suffer the complications of the new system. Apologies for the layout.

Right, here we go.

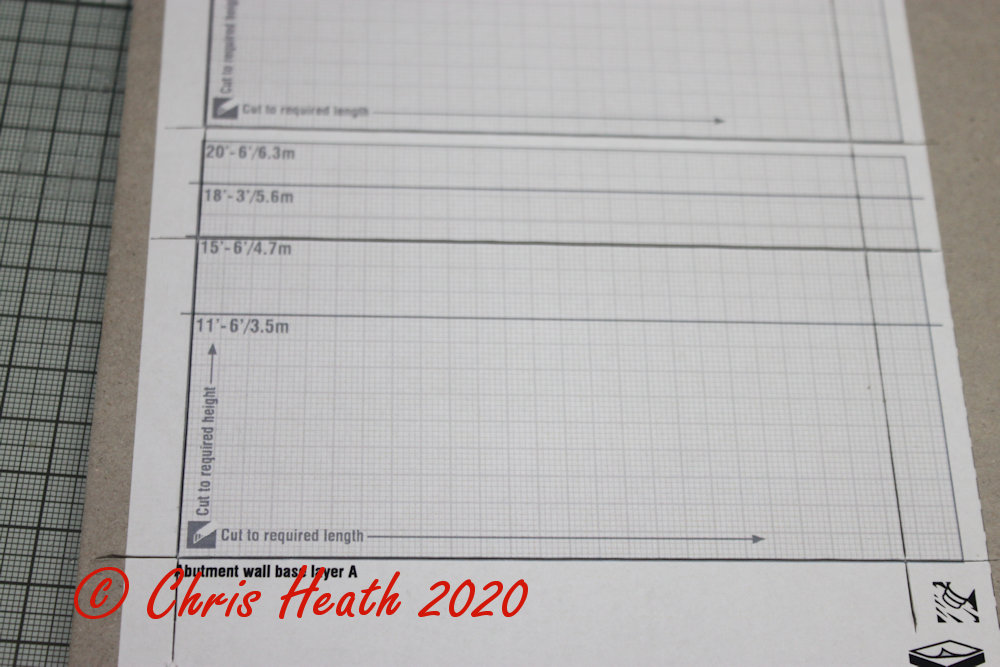
Next to be made are the abutments. 

        Like with the main deck, there is a very clever grid system, to make sure that everything is kept true and square.

          It also helps with the height calculations for your bridge. Cut out the two abutments.

           I’ve gone for 15’ 6” or 4.7m.

       Next cut two of the abutment wall b pieces, and glue to the back of the abutment walls.


        I’ll show you what I retrieved from the recycling bin at work. These two, very heavy and compact batteries out of a portable power supply, have made their way to my work table, and they prove very effective as weights to make sure good adhesion to glued up components. Result!!

Next cut out and glue together the buttresses into blocks of four.


 Once the glue has set, glue the Buttresses to the back of the main abutment. Clamp these together and leave to dry.

         Next cut out the abutment wall cover layer. I love the fine detail of this brickwork. The water staining is so realistic.


Wrap and glue the cover layer around the base layer.
Top tip. When i built the previous version of this kit, the girder bridge, when came to glue the wing walls to the abutment, because I use self adhesive labels, the wing walls have eventually worked the cover layer lose. So this time I’ve glued the cove layer to the abutment to make sure it stays in place.


Next comes the buttress cover layers. Take care to use a new sharp fine blade to cut out the individual bricks. I like to run a marker along the raw edge of the brick. So that when wrapped around the buttress, it disguises the join.

So that when wrapped around the buttress, it disguises the join.


        Next cut out the abutment copping and glue into place.


        Buttress capping next. Cut out the base layers and wrap the cover layers over them.

    The glue to the top of the buttresses.       That completes the abutment walls.

Next comes the wing walls. Firstly,cut and glue the wing wall buttress base layers into three.


    Wrap with the cover layer.

    Fit the capping and set aside.


  Next cut out the wing wall coping base layers and wrap the cover layers around.


 The wing wall are next. Cut out both the front and back pieces.

       Then glue the back to back. Set aside for the glue to dry.

Once the glue has dried, take a new sharp blade and using a steel ruler, run along the light blue line at an angle of 45 degrees.

Fit the coping to the top of the wing wall.
   Trim the coping to the size of the wing    wall.

         Glue the wing wall to the abutment. This is where the extra gluing comes into play.

    Fit the wing wall buttresses next.

And that’s it.  I hope that this build has helped with original question about how to make the Jack Arch. (I know that the copyright date is wrong. I had to edit the last of the pictures in a different editing program).


 ·  Until Next Time.............


Wednesday 7 October 2020

Jack Arched Bridge...........


A short while ago over on the Scalescenes modellers group page on Facebook, there was a post with regard to the R012a Jack Arched Bridge. The original post was from a new member who was confused how the Jack Arches were formed. I hadn’t built the kit at the time, so I couldn’t comment on how to actually put the kit together. But I’ve had a little time on my hands, so I’ve had a go at the kit so that I can try and explain how the arches go together.
Before I get started, could I please apologise for the layout of this post. The program that I use to write my blog posts in has seriously updated, and it refuses to let me use pictures as I have done before. I have tried to publish this post a couple of times, and twice it's decided post what it wanted to post. Hopefully I'll get me ageing head around it for next time. 
Here we go.
First of all, glue or stick all of the relevant sheets in connection to the Jack Arch version of the kit, to the relevant thickness of card.

Next decide what width and length you need the bridge to be. There are very handy grid lines on either side of the bridge deck, so that you can very easily keep the deck square and true when you cut it out


Make sure that you use the guide lines on the edge to keep the arches even.
Next, cut out the deck cover layer and lay deck underside over the top of it, and glue into place. 
Once the glue has dried, trim around the deck cover layer.
Next, cut out and glue the two outer edge girders A into place. 
Follow by cutting out and gluing into place the rest of the girders A.

. Once the glue has dried, trim to length.

Next cut out and glue into place the girders B. I like to run a marker along the edge to cover any raw edges
Once the glue has dried, trim to length.
Next, cut out the jack arches and trim to length.
Use a pen or something similar to introduce a slight curve along the length. I’ve used a piece of dowelling here.
Once you have the arches curved, start to test fit and glue into position. 

I think I may have introduced a little too much curve to my arches, as they don’t come up to the top of the girder B. However, I did colour the raw edges, so I think I might have just gotten away with it.

Cut out and fit the girder edges over the top of the girders B next
Make sure to centre the flange plate spacers.


Next, cut out and glue all of the flange plates into place.

Then trim to length.
Cut out and glue together the inner and outer side girders next, and trim to length. 
Glue the competed side girder to the edge of the deck
Next cut out and fit the side girder bottom to the underside of the side girder. Next cut out and fit the side girder bottom to the underside of the side girder.
Again making sure that you keep it centred. Then fit the flange pates.
Cut out and fit the side girder top the upper side of the side girder.

At this point, there are a couple of options for the parapet. I used the steel option for the last bridge I built, so this time, I’ve opted for the brick parapet.
Cut out and trim to length the two pair parapet B walls. 

Glue both pairs back to back.


Cut out and trim the parapet coping base layer and cover layers to length
Wrap the cover layer around the base layer.


Then glue the coping to the top of the parapet wall.
Leaving a reveal on the top of the girder.
Fit the girder ends plates

That’s where I’m up to for now. Give me a couple of days, and I’ll post the rest of the build.

Until Next Time..........