
Now I know I’m a little behind the game with this kit, as it was
released at the back end of 2020. But I think it’s about time I have a go at
the new revised Scalescenes R013a Retaining Wall. I’ve been taking a close look
at the kit, and I reckon that the ramp sections will make an interesting
addition to much anticipated Shops on a slope kit, hopefully to be released
soon.
So let’s get started.
It starts by deciding which way I want the slope, and I’ve gone with the
right hand side. So all of the pieces I need for the ramp will be marked with a
“R”
 |
 |
While the glue dries on these, cut out the Support Walls.

Then sitting the support walls A, on a level surface, glue the support walls
B to the support wall A. Ensuring that they are aligned along the bottom, as
this will ensure that the wall will be perpendicular. (But it’s always best to
check).
|
|


Next cut out the Arch Infills and introduce a slight curve, and glue in
between the Support walls B.
 |
 |
The next stage is to cut out all of the Buttresses and glue the back to
back. Take notice of the ones marked A to H, as these are for the ramp section.
Again, while these are drying, cut out the Front walls. Mark on the back of the
Front wall the corresponding A - H to ensure the right buttresses get glued to
the correct position.
|
|
 |

|
|
 |
|
|
 |


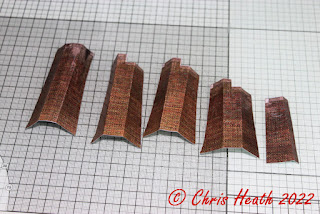
Next cut out the Buttress cover layers and wrap them tightly around the
corresponding buttresses.
|
|
 |
|
|
 |


Cut out the Soffit cover layers and use your marker pen to cover the raw
edges. Test fit and glue into position.
|
|
 |

Once all of the Soffits are in place, test fit and glue the completed
section over the Support wall A.
Sorry, but I don’t have a picture of the two of these coming together,
as I forgot to take the picture.
Next, cut out and glue together the Support Wall Lower Ramp B pieces R5
to R12. While drying, cut out the Lower ramp sections 1 & 2.
|
|
 |

Next, glue the pieces R5 to R12 to the Lower ramp sections, and join the
two together.

Next, cut and glue into place the Lower Ramp Support C pieces, ensuring
that the angled edges are facing out.

Next, cut out and wrap the Lower Ramp Buttress base layers with the
corresponding cover layers. Once these are done, cut out the Lower Ramp Front
Wall. Glue the corresponding buttresses to the Front walls.
|
|
 |

Once the glue is dry, glue the Front wall over the base.
|
|
 |


|
|
 |
 |
|


Next, cut out the required amount of Parapet walls and glue back to back.
|
|
|


|
|
|


|
|
 |

Once the glue is dry, wrap the
cover layer around the base. Then glue into place at the end of the parapet
wall.
Cut out the End Buttress cap and wrap the cover layer. Glue into place.
|
|
 |

Cut out the Parapet Wall Coping. Colour the raw edges and glue on top of the Parapet wall.
|
|
 |

And that’s it. All ready for the shops on a slope, once they are
released.

Until Next Time………….
