Time
to get my butt into gear and take advantage of this unseasonably cool weather,
to get into the loft and get the Scalescenes T040a Lifeboat finished. As with
the previous session I had, this is all about everything above deck.
First
job this time is to cut it and cover the Anchor Guard base layers. Make sure to
cut one edge of the base layer at an angle. Once done, set aside for
now.
|
|
|
Next
is to cut out and run a coloured marker along the raw edge of the rails, then
glue into place the Deck Toe Rail. Take note of the Bow end, and use the white
lines on the deck to get these into the correct position. Once these are in
place, glue the Anchor Guards into place.
|
|
|
|
|
|
Cut
out and glue the Bow Fender into place next.
|
|
|
Next,
cut out both of the Anchors and the Rudder. Fold and glue them in half and set
aside for now.
|
|
|
Right,
now for a fiddly bit. Using the Lifeline jig supplied, bend some thin wire into
shape. I used 24 gauge white florists wire. In hindsight, I wished I’d used
some finer wire. But this is all I had at hand, so it had to do.
|
|
|
|
|
|
Using
the same wire, cut out the Cabin Handrail jig and use it to shape the Handrail.
Then glue into place.
|
|
|
Next
is even finer for me. I always struggle with detail this fine. My eyes don’t
see it too well, and my fingers are far too big. But I’m going to give it a go
anyway.
Again
using the supplied jig, cut strips of Styrene and lay them over the jig and
tape into place. I’m using the recommended Evergreen Styrene #121 0.75mm for
the Stanchions and Evergreen Styrene #100 0.5mm for the hand rails. Once the
Stanchions are taped into place, using a suitable liquid poly, I use the Revell
Fine tip applicator, lay the handrails into place. Let the rails bond fully
before taking off the jig. I waited until the end to add the Handrails, because
I didn’t want to knock them off.
|
|
|
|
|
|
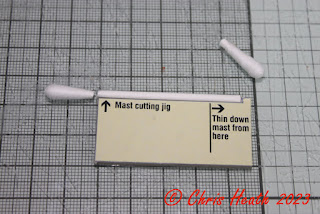
Cut
out the Mast cutting jig next. Cut a paper stemmed cotton bud to size, and
unwrap a section at the end to make it thinner. Then using a black marker,
colour the thin end.
|
|
|
Wrap
and glue the mast base into place. Tightly roll and glue the Masthead lights.
Once the glue is dried, cut the three lights out (one is a spare). Glue the two
lights onto the Mast. I used a couple of scraps of styrene to fashion an
aerial. I used some Evergreen Rod #221 for the Aft mast. Set these aside until
the end.
|
|
|
|
|
|
|
|
|
Starting
mid ship, use a suitable glue to glue the Handrails into place. I used a medium
thickness CA. Let the glue dry before moving onto the Bow and Stern
sections.
|
|
|
Next,
cut out and glue into place the Mast Hinges. After deciding the position of the
Mast, glue it into place. Glue the Aft Mast into place.
|
|
|
|
|
|
Glue
the Anchors and the Rudder into place.
|
|
|
And
that’s it. I’m calling this one done!
|
|
|
|
|
|
|
|
|
It’s
been an extended build due to the heat in the loft, but in the main, I’ve
enjoyed this kit. It’s a been bit out of my comfort zone, what with all of the fine
detail, but it’s good to challenge yourself now and again. I can’t wait for the
accompanying Lifeboat Station. Due to be released shortly.
Until
Next Time………….


