Here’s the second part of the build for the T014a
Non-conformist Chapel from Scalescenes. Like I said in the previous post, it’s
not just a Chapel, it could be repurposed for many more options.
Right, let’s get this kit
finished.
Cut out the plinth B and C base layers and wrap the cover
layers. Once the glue has dried, glue the completed Plinths into place. Make
sure that the Downpipes are aligned.
|
|
|
|
|
|
Next cut out the External Buttress capping and glue into
place.
|
|
|
The Porch is next. Cut out the Porch Columns and glue into
two blocks of two. Once the glue has dried, wrap the Porch Column cover layers
into place. Then glue into place either side of the door.
|
|
|
|
|
|
Next, cut out the Plinth A base layers and wrap the
corresponding cover layers around them. Test fit them and glue them into
place.
|
|
|
Next, cut out Porch B base layers and glue the two
together. Cut out the Porch B cover layer and wrap around the base edge.
|
|
|
Cut out Porch A and C base layers next. Glue the two C’s
together. Cut out he corresponding cover layers and wrap them over the base
layers. Once wrapped, glue A, B and C over the door.
|
|
|
|
|
|
Next, cut out the Coping base layer and wrap the cover
layer around. Make a light score cut on the red line. Test fit and glue into
place. Cut out the Coping Ridge and glue it into place on the apex of the
coping.
|
|
|
|
|
|
|
|
|
Cut out the Office Side Walls B1 and B2. Glue together
back to back, print side out.
|
|
|
Next, cut out the Office Wall and Office Side Wall B
sections. Squarely glue the side wall B to the right hand side of the Office
wall. Cut out the Office wall cover layer and glue into place on the office
wall. Wrap the flaps of the window and doorway. The cut out and glue into place
the window sill.
|
|
|
|
|
|
|
|
|
Next cut out, test fit and glue the Internal Office Wall
into place.
|
|
|
Cut out the Office Side Wall A1 base layer and wrap its
cover layer around. Wrap and glue the window flaps, and add the window sill and
window.
|
|
|
|
|
|
Next, cut out the Office side wall A2 and wrap the Office
down pipe into place. Line up at the bottom, walls A1 and A2 and glue back to
back. Then glue squarely into place on the lefthand side if the Office
wall.
|
|
|
|
|
|
Cut out and glue the two Office dividing walls back to
back. Cut out the Fireplace base layer and wrap its cover layer into place.
Then squarely glue into place the complete dividing wall.
|
|
|
|
|
|
|
|
|
Next, glue the Office walls into place.
|
|
|
Cut out the Office Ceiling Underside and place it face
down. Then glue the Office Ceiling over the top. Wrap the Gutter flap around
and glue into place. Cut away the hatched edges.
|
|
|
|
|
|
Next, cut out the four Office roof supports and glue
into two blocks of two. Glue into place on the Office ceiling.
|
|
|
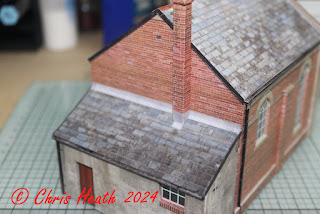
Cut out the Roof and tiles next and as with the main roof,
glue the tiles into place. Test fit and glue the completed roof into place and
glue the Office roof flashing into place.
|
|
|
|
|
|
Next, cut out the three Chimney base layers and glue into
a block. Wrap the Chimney cover layer tightly around the base. The glue the
Chimney into place. Then wrap and glue the Chimney cap then glue into
place.
|
|
|
|
|
|
Cut out and glue into place the Barge boards.
|
|
|
Finally, cut out and tightly roll the Pipes into tubes.
Use the supplied jig to cut pipe B with an angle. Then glue into place.
|
|
|
And that’s it. I’m calling this one done.
|
|
|
|
|
|
|
|
|
I’ve enjoyed this kit immensely, its simplicity makes it
an easy build, but it’s still a highly detailed kit. Can’t wait for the next
one.
Until Next Time………..


