Well it’s time to change the blades in my knives and
sharpen my pencil, because the new kit from Scalescenes the T014a
Non-conformist Chapel is here. I know that the kit has been available for a few
weeks now but, I’ve only now had time to collate all of the photos of the build
process and get some words written for my blog.
The kit is sold as a Non-conformist
Chapel, and it certainly fits that bill, but I think that there are far more
uses that the final build could be used for. A pump house, an engine house, a
library or a village hall, not to mention any kit bashing, the options are
numerous.
Anyway enough rambling on, let’s get
started.
Firstly, get all of the kit and the
instructions printed off. Then glue all of the pages onto their relevant thickness
of card. In this case, as with most of Scalescenes models, 2mm, 1mm greyboard
and 200gsm light card. I print onto A4 self-adhesive labels, with a colour
laser printer. Make sure there are no air bubbles. I use a brayer roller.
|
|
|
|
|
|
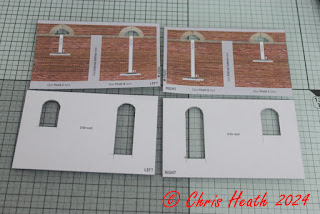
Next, cut out both the Side Walls base layers and cover
them with their corresponding cover layers, taking care to line up the arch of
the windows. Wrap the window flaps around and glue in place. Carefully colour
the underside of the arch with a felt pen.
I’m lucky, I have a wide array of
pens. Each with three shades per pen. (144 colours)
|
|
|
|
|
|
Cut out the window sills next, and glue into place.
|
|
|
|
|
|
Next, cut out the windows. I’m using the Scaleglaze 14
option. Glue them centrally in the window aperture. Set aside to dry.
|
|
|
|
|
|
Next, cut out the Internal Buttresses A and wrap their
corresponding cover layers around. Repeat the process for Internal Buttresses
B, and glue into place on the internal walls.
|
|
|
|
|
|
Cut out the Radiators next and glue them into place.
|
|
|
Next, cut out both of the Rear Wall base layers and glue
together. Set aside under-weight to dry. While the glue dries on the rear wall,
cut out the Rear Wall Cover Layer. Once the glue has dried on the base, wrap
the cover layer over the base. Glue the flaps tightly around.
|
|
|
|
|
|
Cut out the Internal Rear Wall along with the two
Downpipes. Wrap the two Downpipes over the Interior Wall edges. Then line up
the bottom edge and glue the Rear Wall and the Interior Wall back to back.
There should be a slight overhang. This is to form the Drainpipes.
|
|
|
|
|
|
Next, cut out the Front Wall base layer and the Front Wall
cover layer, and glue the cover layer in place. Line up with the window sills.
As with side walls, glue the sills and windows in place. Don’t forget to colour
underside of the window base layer.
|
|
|
Carefully cut out the Gable next, and glue it squarely
into place on the front wall. Cut out Gable edges A and B and glue into
place.
|
|
|
|
|
|
Next, cut out a Front Door option and glue to the back of
the front wall. Cut the Interior Front Wall and fit an Interior door. Then
place the front wall section face down and glue the interior Wall into place.
Apply weight and set aside to dry.
|
|
|
|
|
|
Making sure that the walls are square and flat, glue front
and back walls to the side walls. Once you make sure everything is square and
perpendicular, set aside to dry.
|
|
|
Next, cut out the two Column A and B base layers. Lay
column A flat and glue column B in place. Repeat for the second one. Cut out
the Column Cover layers and wrap around the base layers. Once the glue is dry,
glue the columns into place on the front corners.
|
|
|
|
|
|
Cut out and glue into place the Left and Right Ledges into
place next. Make sure that the downpipe top edges are lined up.
|
|
|
Next, cut out the Internal Gables A and B and glue
together. Once dried, glue into place on the front interior wall.
|
|
|
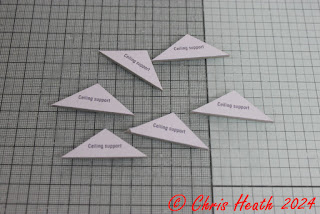
Next, cut out the six Ceiling supports and glue into three
blocks of two. The glue into place on the two gables.
|
|
|
|
|
|
Cut out the Gutter base layers and Cover layers next. Wrap
the cover layer over the base layers and cut out the hatched sections. Colour
the raw edges then test fit and glue into place.
|
|
|
|
|
|
With a sharp blade cut out the Roof Tiles and keep them in
numerical order. Cut out the roof base layer and lightly score the red line. Starting
at the bottom, use strip one and glue into place on the light blue line.
Continue all the way to the top, slightly overlapping as you go. Trim off all
of the edges. At this point, I lightly colour the raw edges of the strips of
tiles. Repeat on the other side.
|
|
|
|
|
|
Next, test fit and glue the roof into place. Cut out the
ridge tiles and glue into place.
|
|
|
I have a confession at this point, I forgot to add the
interior Ceiling into place. When I realised, the glue had dried on the roof,
so I had to retro fit the ceiling (In a fashion)
That’s it for now, I should have the rest of the build written up in the next couple of days. So check in soon, to see the complete build.
Until Next Time………..


1 comment:
Downloaded mine a few days ago ready to add to my 009 layout that's under construction cheers for the tips
Post a Comment