
Here we
go, I’ve managed to get another Facade done for the new Scalescenes T004. This
one is the B2 Facade, the second of the wider options.
Let’s go.
As previously it starts with
cutting out the Facade Base Layer and the covering it with the Facade Cover
Layer. Note that I only cut out the top and bottom of the windows on the cover
layer. Like I said in a previous post, it helps to keep the piece square as you
glue it into position. Once in place, make the final cuts.
 |
 |
Next cut
out the Sills and glue into position.
 |
 |
The
windows are next. As I said before, I’m using Scaleglaze Windows. I’m using
Scaleglaze 3 windows L x 5 and D x 3. Simply cut them out and glue centrally in
the window openings.
 |
 |
Next, cut
out the base and cover layers for both the right and left Buttresses. Wrap the
Downpipe edge of the cover layer tightly around the base layer, but leave the
other edge unglued at this stage. Lining up the Buttress base edge with the
edge of the facade, glue into place.
 |
 |
 |
 |
The
Parapet Side Walls are next. Simply cut them out and glue back to back. Once
the glue is dry, glue them onto the top edge of the side walls.
 |
 |
Next cut
out the Sidewall Cover layers and glue into position.
 |
 |
Cut out
the base and the cover layer for the Plinth and glue together. Cut out and glue
the Plinth Sill into place. You can now glue the complete plinth into place on
the Facade.
 |
 |
 |
 |
Next, cut
out the Entry Side Walls 1 and glue into one block of four and the Side Walls 2
into a block of two. Cut out Entry Steps A and B and cover them with their
respective cover layers. Then glue Step B on top of Step A. Cut out your chosen
door and the Entry Ceiling. Starting on the left, test fit the Entry side wall
block of four. I had to reduce the thickness of my wall as the thickness of my
card must have been too thick. Once you’re happy with the fit, glue the wall
into place. Next glue the steps into place. Next glue the righthand side wall
into place along with the ceiling. Once this all glued together, glue the
completed Doorway Entry into place within the downstairs room.
 |
 |
 |
 |
 |
 |
 |
 |
Next
align the top edge and glue the completed Facade onto the building. Making sure
the steps line up.
 |
|
Cut out and glue Ledge 1 into
place.
 |
|
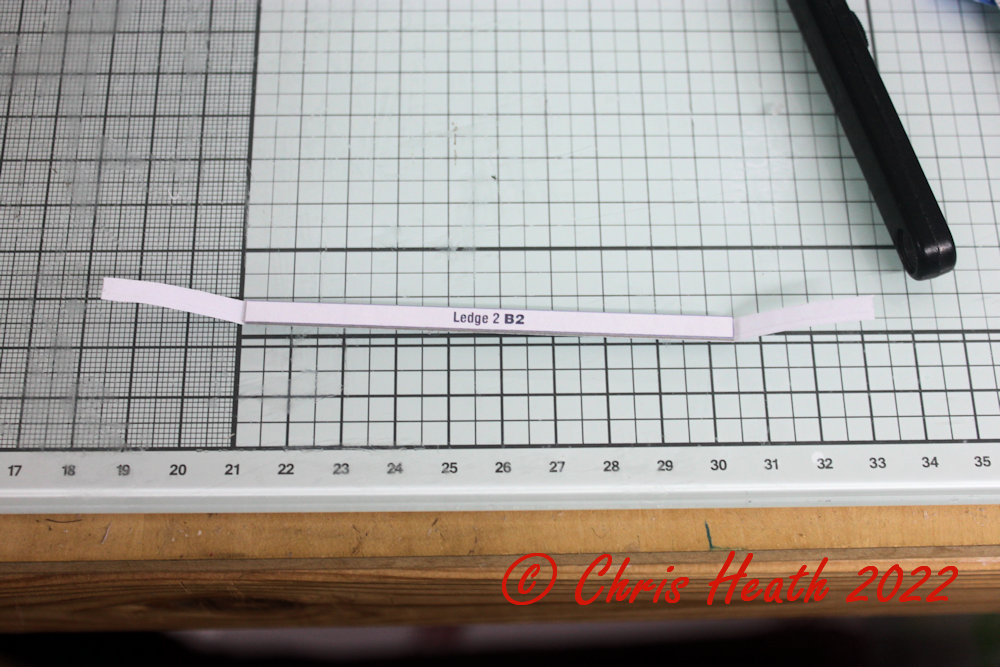
Cut out
the base of Ledge 2 and place in the centre of Ledge 2 cover layer. Don’t glue
the ends yet. Glue the complete Ledge 2 into place along the top of the Facade.
Wrap the loose edges around the side walls.
 |
 |
With a
new sharp blade, cut out and glue into place the Widow Surrounds.
 |
 |
Cut out
the elements for the Window Pediments, glue the Pediments into place above the
windows and then glue the Pediment Caps into place.
 |
 |
Cut out
the Frieze base layers next and glue onto a block of three. Cut out then wrap
the Frieze cover layer over the block of three base. Cut out the Cornice and
Architrave base and cover layers, the wrap the covers over the base layers.
Glue the completed Cornice and Architrave elements over the Frieze. Glue the
Frieze over the doorway. Then cut out the Cornice Flashing and glue over the
top of the Frieze.
 |
 |
 |
 |
 |
|
Then roof
is next. Cut out the Roof base layer and all of the numbered Roof Tile strips.
Starting with #1 glue the Roof tiles into place. Then trim off all of the
excess.
 |
 |
Cut out
both Roof Support 1 and 2 next. The glue into place.
 |
 |
Once the
glue is dry on the roof supports, test fit and glue the completed roof section
into place. Then cut out and glue the Ridge Capping into place.
 |
 |
Next, cut
out and glue into a block of four, the Chimney base pieces. While the glue is
drying, cut out the Chimney cover layer and the Chimney caps A and B and wrap
their cover layers around them. Wrap the Chimney cover layer around the Chimney
base, the glue the completed Chimney structure into place on the rear of the
roof.
 |
 |
 |
 |
 |
|
Cut out
and glue the Side Wall Capping into place.
 |
|
Cut out
the Parapet base and cover layers and wrap the cover tightly around the base
layer. The glue the Parapet Wall into position on the top of the
building.
 |
|
Then
finally cut out the Leader Heads and glue these into place.
 |
|
And
that’s another one done.
 |
 |
The next
one will be Facade A4.
Until Next Time……….
 |
|
No comments:
Post a Comment