Sunday, 26 August 2018

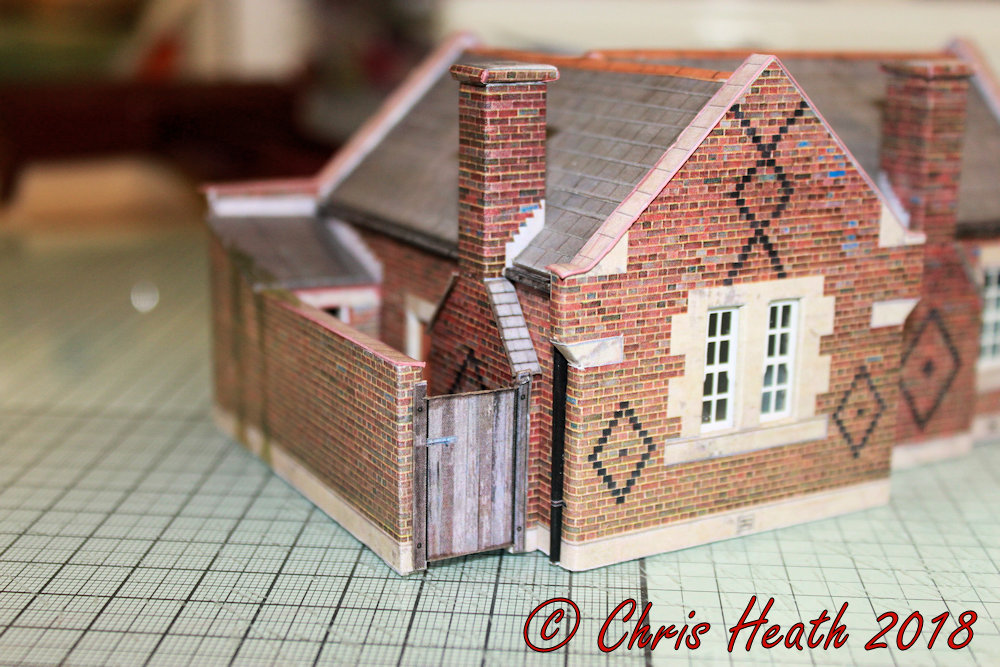
Finished Crossing Keepers Cottage........

Now that all the walls have been built its now time to put them all together. It’s very important at this stage, to make sure that everything is square. A small block square is fine for making sure the walls are perpendicular, but I found two combination squares put together, holds all the structure square while the glue sets.


The extension is next. The walls are of the same construction as the rest of the building, two side walls, one with chimney built into it, and a gable wall.
When I fixed these to the main structure, I wanted to make sure these were also square. The way I done it, was to cut a scrap piece of card the same width between the two walls at the gable end. So when I glued the walls to the main building, I use the same piece of scrap card as a spacer to keep the structure square.   
 
 
On with the ceilings next. These also incorporate the guttering. 
 

Once the ceilings are in place, it’s time to construct the roof. Lots of rows of slates. 
 

The cottage has two roofs. The transition between the two on this kit, has a simple but clever addition of valley flashing. 
  
 
The outbuilding wall is next. And there’s no lack of detail here either. Down to detailed door frames. And a piece that I personally like, is a baton gate.


Finally to put on all of the gable coping stones and the chimney capping, and that’s it. 


I like this little cottage. It’s got me back to my craft table. It hasn’t taken too long to build and it would be a great kit for a beginner. It’s the first time I’ve used the Scaleglaze windows, and I think they are a fantastic addition the Scalescenes range. 

I’ve got the bit between my teeth again now, and my next project is to build another modern cargo ship. As a general bulk cargo carrier.  Watch this space. 

Until Next Time...........


Tuesday, 21 August 2018

Crossing Keepers Cottage.............


Time to get back to modelling I think. To break myself back in gently, I’m going to build the latest release from Scalescenes, the R007a Crossing Keepers Cottage. It’s not a huge or complicated build, but it’s just the right size to get me back in the swing. It also gives me the chance to use my new windows from Scaleglaze. I’m building it in brown brick (as usual) I must diversify a little, and try some different textures. There’s plenty to choose from after all. 
 
It all starts as usual by cutting out the base layers, to be covered by the detailed cover layers. As you can see, the join or overlap is cut into the brick. This when wrapped around the finished wall, cleverly disguises the join. 


Once the walls are put together and before the windows are fitted, the window sills are put into place. I like to colour the raw edges before I fit them. It helps when I’ve got a vast array of pens to chose from. 
 

It’s now time to fit the new windows. I must admit, I like the idea of not having to cut out these little windows, it’s a lot easier to use something that is already made. 
I like these windows, I like them a lot.
 
 
Next comes very clever bit, it’s the inclusion of drainpipes. These are built into one of the internal walls. So when the model is complete, There is no chance of knocking off the drainpipes.


A chimney stack comes next, again with a cleverly wrapped cover layer to hide the join in the brickwork. 
 
 
That’s my progress so far, I’m taking it slow, so as not to aggravate my tennis elbow. 
Until Next Time...........


Saturday, 18 August 2018

New Windows


Hello again. I know I’ve been missing for a while, but there’s been too much going on in my life, that would allow me to make any models, let alone Blog about them. Well, now I think I may just be about to return to getting my modelling back on track. 
 
I have a few projects in mind for the next few months, and it all starts with a package I’ve received from Scalescenes. It contained a selection of the new range of Scaleglaze screen printed windows. 


If there’s one thing I don’t relish doing when cutting out a model, it’s the windows. I have the patience of a two year old. So now that there’s an instant window fix, it’s all systems go. 
The quality of these windows are to a very high standard. They are screen printed with fine detail, onto quality 100 micron/100 gsm clear film, and come in a choice of 00 or N gauge. 


With the addition of these windows, instead of my raggy uneven cut efforts, I can’t wait to get started and see the results. 

What to build? I’m going to build the new R007a Crossing Keepers Cottage. I know that it’s not a huge build but, like I said previously, I have the patience of on two year old and I want to see the end result quickly.

Keep watching to see the end result. 

Until Next Time.........…


Thursday, 28 December 2017

New Release..................


New Release...............

Just a quick post to let those of you that don’t know, Scalescenes have released their latest kit. It’s fantastic T013a 1970’s style semi detached houses. I’ve got my kit and I’m eager to get started. I think that it’s going to be a cracking build, simply because, unlike most of the houses that I’ve built so far, which have small sash style windows, which are difficult to see any detail inside, these houses have really big windows at the front, which opens up the view right through the open plan living space and bedrooms. So, it offers its self for fully furnishing the rooms with the TX00a Interior Detail pack. It has everything that you need to furnish the rooms. From sofas and washing machines, to beds and stereos. Time to go to town with the detail on this one I think. Keep popping by to chart my progress with this build, over the coming couple of weeks. 

It’s been a busy year for John at Scalescenes. He’s produced a huge amount of quality downloadable kits. From the latest 1970’s houses, to that huge Modern Cargo Ship, that was a pleasure to build. A Castle/Folly to the versatile CLASP System, ideal for anything from a Telephone Exchange to a Public Library. There was the Low Relief House Fronts with Shops options and a Stone Warehouse. And to name a few of the others, a Water Tower, a Huge Industrial Chimney and a Factory/Warehouse. Let’s hope that he keeps up the good work and continues to bring us fabulous, detailed and affordable kits for the model railway enthusiast. And don't forget about the Scalescenes Gift Certificates. Available here Gift Certificate

Can I now take this opportunity to wish everyone that takes the time to read my ramblings on here and watches my progress, a belated Merry Christmas and a very healthy and a Happy New Year. Let’s hope that all that we wish for in 2018 comes to us all, and that Scalescenes keep coming up with fantastic kits. I can’t wait for the Fire Station (just saying John).

Stay safe out there and see you next year. 

Until Next Time...........

Monday, 11 December 2017

Gift Certificates............


Just a quick one for you. If you are stuck for a present for someone who is hard to buy for this Christmas, the Scalescenes website has gift certificates available. These are for any amount you choose. For the modeller in your life who is hard to buy for, these are ideal. Let them choose what they really want. Trust me, we get sick of socks, handkerchiefs and gloves. These can be found with this quick link. Scalescenes Gift Certificate. 
Until Next Time............
 

Sunday, 26 November 2017

Finally Finished...........


Well I’ve finally finished the T030c Modern Cargo Ship from Scalescenes. The final push was to fit all of the small detail. 

First were the three sets of stairs, for access to all of the deck levels.
 
Next is the supports for the containers. I’m sorry that there are not many pictures of the making of them, but I was on such a mission to get the model finished, I got carried away. 

Once I got them all made, I fit them all down the hull and loaded up the containers.
 
All of the fine detail comes next. The hand rails, the stair rails and the masts. For the railings, I used the Faller kit recommended by Scalescenes. I must say I’m impressed. 
The masts were made from Ever Green hollow tube, donated from a work colleague.


And here it is, in all its glory.


The pictures simply don’t do it justice. If you are confident and want to try this kit. Don’t hesitate, it’s fantastic. 

Who would of thought that from this......


To this...... 


Would result in this.

 
I don’t know what’s next, but I’m sure I’ll let you all know what it is and how I get on with it. 
Until Next Time..........