
Right, I’m now ready to get started on the Facades for the new T004
Shops on a Slope kit from Scalescenes. I’ve built all of the backs for the number of shops I require. There are a number of different facades in the kit,
eight to be precise. There are five for the smaller buildings (A1-A5) two for
the larger shops (B1 and B2) and one for the corner shop (Structure C). There’s
also a wide range of shop interiors which come with the kit. I’m going to build
one of each for now.
Just in case you’re interested the dimensions of the buildings are, the
small shops are 68mm wide. The large shops are 93mm wide and the corner shop is
98mm wide. Al of the shops are 27mm deep. The length is infinite as you build as
many as you like. The configuration I’m doing is 625mm long.
Right let’s get started. I’m building Facade A1.
Start off by cutting out both the base layer and cover layer and glue
the cover layer over the base layer.
Using a marker pen, colour the underside of the window openings. Then
cut out and glue the Lower sill into position.
 |
 |
 |
 |
 |
|
Next cut out the pieces for the Upper Sill. Wrap the cover layer around
the base layer and glue into place on the facade.
 |
 |
Cut out the windows next. I’m using the Scaleglaze option. They are
Scaleglaze 12 and 16. Glue them into position in the centre of the window
opening.
 |
 |
Next, cut out your chosen shop front. I’m just going to go 1, 2, 3 and
so on. Glue your chosen shop front into place.
 |
 |
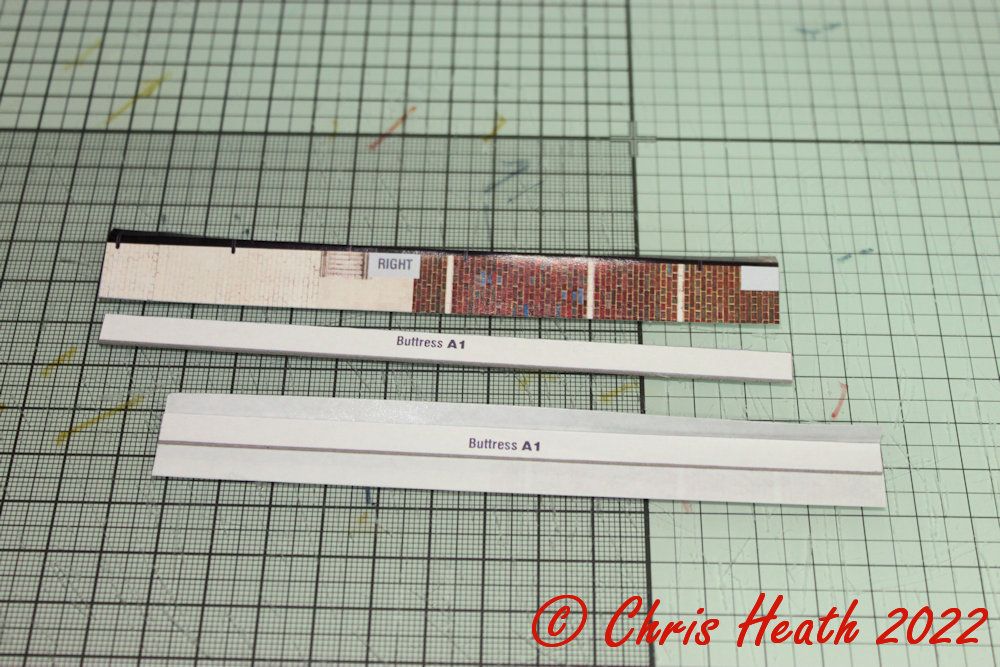
Cut out both the Buttress base and cover layers and wrap down pie edge
around the Buttress base layer. Don’t glue the flap with the brickwork on yet.
Align the edge of the buttress with the edge of the facade and glue into
place. Then wrap the brickwork around the back of the facade.
 |
 |
 |
 |
 |
|
Next, cut out Plinth A Base and cover layer. Wrap the cover layer over the base. Cut out the Step A and glue into place.
 |
 |
 |
 |
Cut out and wrap the Facia cover layer over the Facia base layer. Then
apply your choice of Shop sign and glue the complete sign into place.
 |
 |
 |
|
Cut out and glue into place the Lower/ Upper and End Gable Corbels.
 |
 |
 |
 |
 |
|
Start to fill in your shops with any interior items now.
 |
 |
 |
|
Glue the complete Facade into place. Making sure everything is square
and true.
 |
|
Time for the roof now. Cut out the Gutter cover layers and glue into
place on the Gutter Base layer and set aside while you cut out and glue
together the upper side walls. Also cut out the Roof Support 1. Glue all of the
pieces onto the Gutter layer where indicated.
 |
 |
 |
 |
 |
|
Next cut out and glue together the Upper Side Walls 1 back to back. Then glue to the sides of the roof section.
 |
 |
 |
|
Cut out End Gable 1 and End Gable 2. Then glue End Gable 2 on top of End
Gable 1. Then cut out and glue the Awning into place.
 |
 |
Cut out and test fit the Roof section. Trim if it doesn’t fit right. Cut out the corresponding strips of roof tiles, and glue into place in numerical order. Trim the ends off flush to the roof. Fit the roof section into place and fit the Roof Support 2 into place.
 |
 |
 |
 |
Cut out the End Gable Roof and tiles and again glue the tile strips into
place.
 |
 |
Next, glue the End Gable into place. Then glue the Gable roof into
place.
 |
 |
Next, cut out and glue the Barge Boards and Upper side wall capping into
place. (Sorry I forgot to take photos).
Cut out and glue the Side Wall over layers into place.
 |
 |
Cut out and glue into place the Ridge Tiles.
 |
|
Cut out and glue back to back the four Chimney base layers. Then wrap
the cover layer tightly around the chimney base. Then glue onto the roof.
 |
 |
 |
|
The Corner Shop which is Structure C, was built a couple of weeks ago as
a free kit in Hornby magazine. I only had to modify the left hand door to make
it fit.
 |
 |
The next facade will be B1 .
Until Next Time………….

No comments:
Post a Comment